
Your ability to delegate more of your operational duties to AWS and so increase your agility and innovation is made possible by serverless, which is the cloud's inherent architecture. You may create and execute apps and services using serverless technology without giving servers any thought. It does away with infrastructure management duties like capacity provisioning, operating system upkeep, server or cluster provisioning, and patching. Almost any backend service or application can be built with them, and everything needed to run and scale your application with high availability is taken care of for you.

You can run code with AWS Lambda without setting up or managing servers. There is no fee when your code is not executing; you only pay for the compute time you use.
You may use Lambda to run code for almost any kind of application or backend service with no administration required. Simply upload your code, and Lambda will handle all the necessary steps to run and grow it with high availability.

In order to construct, publish, maintain, monitor, and protect APIs at any size, developers can use the fully managed service known as Amazon API Gateway. It provides a complete framework for managing APIs. API Gateway manages traffic, permission and access control, monitoring, and API version management while enabling you to perform hundreds of thousands of API calls concurrently.

A consistent, single-digit millisecond latency at any scale is required by all applications, and Amazon DynamoDB provides a quick and adaptable NoSQL database service that can meet this need.
For internet-scale applications, it is a fully managed, multiregion, multimaster, persistent database with built-in backup and restore, security, and in-memory caching.

Amazon Simple Storage Service is a cloud-based object storage service with industry-leading scalability, data availability, security, and performance. Amazon S3 is a simple web service interface that allows you to store and retrieve any amount of data from anywhere on the internet.
Customers of all sizes and industries can use it to store and protect any amount of data for a variety of use cases, including websites, mobile apps, backup and restore, archiving, enterprise applications, IoT devices, and big data analytics.

In this project I develop and deploy a simple "TODO" application using AWS Lambda and Serverless framework. This application will allow users to create/remove/update/get TODO items. Each TODO item contains the following fields:
- todoId (string) - a unique id for an item
- createdAt (string) - date and time when an item was created
- name (string) - name of a TODO item (e.g. "Change a light bulb")
- dueDate (string) - date and time by which an item should be completed
- done (boolean) - true if an item was completed, false otherwise
- attachmentUrl (string) (optional) - a URL pointing to an image attached to a TODO item
This application will allow creating/removing/updating/fetching TODO items. Each TODO item can optionally have an attachment image. Each user only has access to TODO items that he/she has created.
The application should store TODO items, and each TODO item contains the following fields:
todoId(string) - a unique id for an itemcreatedAt(string) - date and time when an item was createdname(string) - name of a TODO item (e.g. "Change a light bulb")dueDate(string) - date and time by which an item should be completeddone(boolean) - true if an item was completed, false otherwiseattachmentUrl(string) (optional) - a URL pointing to an image attached to a TODO item
You might also store an id of a user who created a TODO item.
- Auth0 account
- GitHub account
- NodeJS version up to 12.xx
- Serverless
- Create a Serverless account user
- Install the Serverless Framework’s CLI (up to VERSION=2.21.1). Refer to the official documentation for more help.
npm install -g [email protected]
serverless --version
- Login and configure serverless to use the AWS credentials
# Login to your dashboard from the CLI. It will ask to open your browser and finish the process.
serverless login
# Configure serverless to use the AWS credentials to deploy the application
# You need to have a pair of Access key (YOUR_ACCESS_KEY_ID and YOUR_SECRET_KEY) of an IAM user with Admin access permissions
sls config credentials --provider aws --key YOUR_ACCESS_KEY_ID --secret YOUR_SECRET_KEY --profile serverless
To implement this project, you need to implement the following functions and configure them in the serverless.yml file:
-
Auth- this function should implement a custom authorizer for API Gateway that should be added to all other functions. -
GetTodos- should return all TODOs for a current user. A user id can be extracted from a JWT token that is sent by the frontend
It should return data that looks like this:
{
  "items": [
    {
      "todoId": "123",
      "createdAt": "2019-07-27T20:01:45.424Z",
      "name": "Buy milk",
      "dueDate": "2019-07-29T20:01:45.424Z",
      "done": false,
      "attachmentUrl": "http://example.com/image.png"
    },
    {
      "todoId": "456",
      "createdAt": "2019-07-27T20:01:45.424Z",
      "name": "Send a letter",
      "dueDate": "2019-07-29T20:01:45.424Z",
      "done": true,
      "attachmentUrl": "http://example.com/image.png"
    },
  ]
}CreateTodo- should create a new TODO for a current user. A shape of data send by a client application to this function can be found in theCreateTodoRequest.tsfile
It receives a new TODO item to be created in JSON format that looks like this:
{
  "createdAt": "2019-07-27T20:01:45.424Z",
  "name": "Buy milk",
  "dueDate": "2019-07-29T20:01:45.424Z",
  "done": false,
  "attachmentUrl": "http://example.com/image.png"
}
It should return a new TODO item that looks like this:
{
  "item": {
    "todoId": "123",
    "createdAt": "2019-07-27T20:01:45.424Z",
    "name": "Buy milk",
    "dueDate": "2019-07-29T20:01:45.424Z",
    "done": false,
    "attachmentUrl": "http://example.com/image.png"
  }
}UpdateTodo- should update a TODO item created by a current user. A shape of data send by a client application to this function can be found in theUpdateTodoRequest.tsfile
It receives an object that contains three fields that can be updated in a TODO item:
{
  "name": "Buy bread",
  "dueDate": "2019-07-29T20:01:45.424Z",
  "done": true
}
The id of an item that should be updated is passed as a URL parameter.
It should return an empty body.
DeleteTodo- should delete a TODO item created by a current user. Expects an id of a TODO item to remove.
It should return an empty body.
GenerateUploadUrl- returns a pre-signed URL that can be used to upload an attachment file for a TODO item.
It should return a JSON object that looks like this:
{
  "uploadUrl": "https://s3-bucket-name.s3.eu-west-2.amazonaws.com/image.png"
}
All functions are already connected to appropriate events from API Gateway.
An id of a user can be extracted from a JWT token passed by a client.
You also need to add any necessary resources to the resources section of the serverless.yml file such as DynamoDB table and S3 bucket.
The client folder contains a web application that can use the API that should be developed in the project.
This frontend should work with your serverless application once it is developed, you don't need to make any changes to the code. The only file that you need to edit is the config.ts file in the client folder. This file configures your client application just as it was done in the course and contains an API endpoint and Auth0 configuration:
const apiId = '...' API Gateway id
export const apiEndpoint = `https://${apiId}.execute-api.us-east-1.amazonaws.com/dev`

export const authConfig = {
  domain: '...',    // Domain from Auth0
  clientId: '...',  // Client id from an Auth0 application
  callbackUrl: 'http://localhost:3000/callback'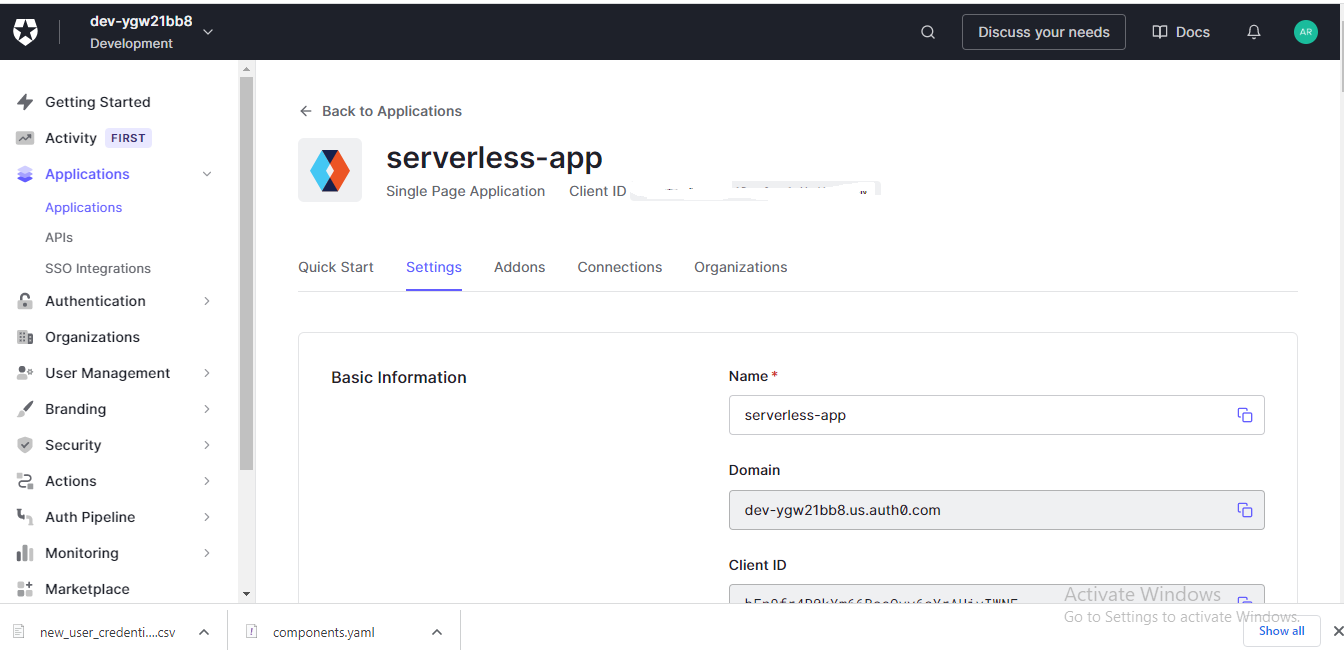
}To implement authentication in your application, you would have to create an Auth0 application and copy "domain" and "client id" to the config.ts file in the client folder. We recommend using asymmetrically encrypted JWT tokens.
To complete this exercise, please follow the best practices from the 6th lesson of this course.
The starter code comes with a configured Winston logger that creates JSON formatted log statements. You can use it to write log messages like this:
import { createLogger } from '../../utils/logger'
const logger = createLogger('auth')

// You can provide additional information with every log statement
// This information can then be used to search for log statements in a log storage system
logger.info('User was authorized', {
  // Additional information stored with a log statement
  key: 'value'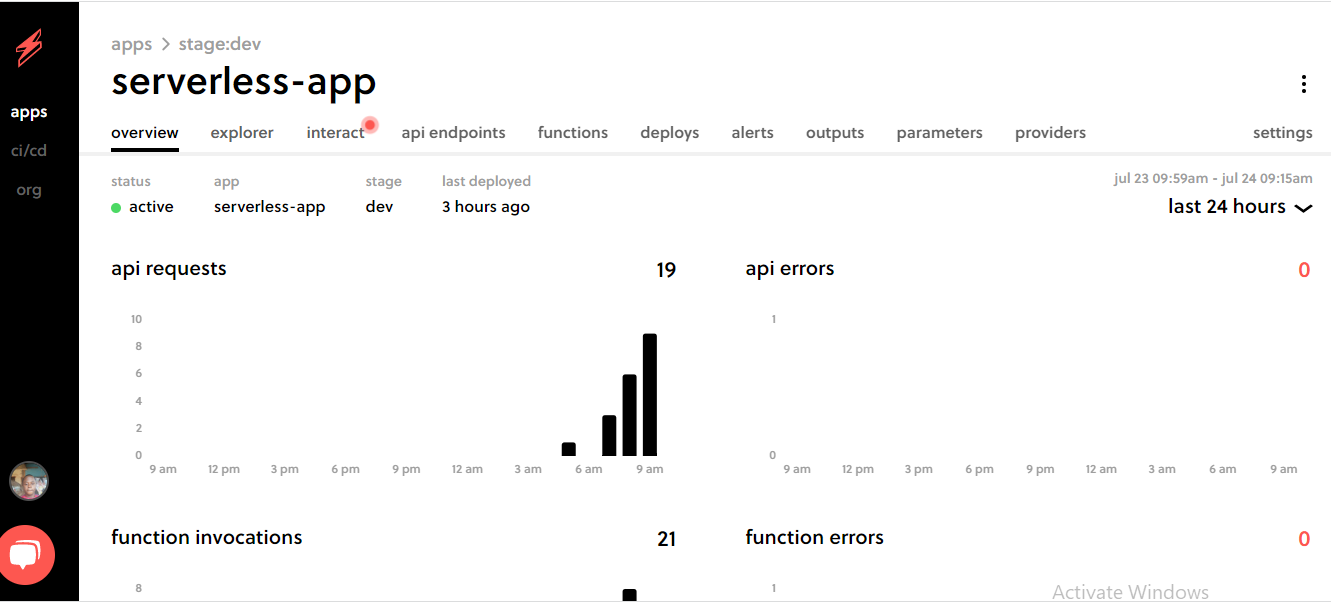
})Once you have finished developing your application, please set apiId and Auth0 parameters in the config.ts file in the client folder. A reviewer would start the React development server to run the frontend that should be configured to interact with your serverless application.
IMPORTANT
Please leave your application running until a submission is reviewed. If implemented correctly it will cost almost nothing when your application is idle.
To store TODO items, you might want to use a DynamoDB table with local secondary index(es). A create a local secondary index you need to create a DynamoDB resource like this:
TodosTable:
  Type: AWS::DynamoDB::Table
  Properties:
    AttributeDefinitions:
      - AttributeName: partitionKey
        AttributeType: S
      - AttributeName: sortKey
        AttributeType: S
      - AttributeName: indexKey
        AttributeType: S
    KeySchema:
      - AttributeName: partitionKey
        KeyType: HASH
      - AttributeName: sortKey
        KeyType: RANGE
    BillingMode: PAY_PER_REQUEST
    TableName: ${self:provider.environment.TODOS_TABLE}
    LocalSecondaryIndexes:
      - IndexName: ${self:provider.environment.INDEX_NAME}
        KeySchema:
          - AttributeName: partitionKey
            KeyType: HASH
          - AttributeName: indexKey
            KeyType: RANGE
        Projection:
          ProjectionType: ALL # What attributes will be copied to an index
To query an index you need to use the query() method like:
await this.dynamoDBClient
  .query({
    TableName: 'table-name',
    IndexName: 'index-name',
    KeyConditionExpression: 'paritionKey = :paritionKey',
    ExpressionAttributeValues: {
      ':paritionKey': partitionKeyValue
    }
  })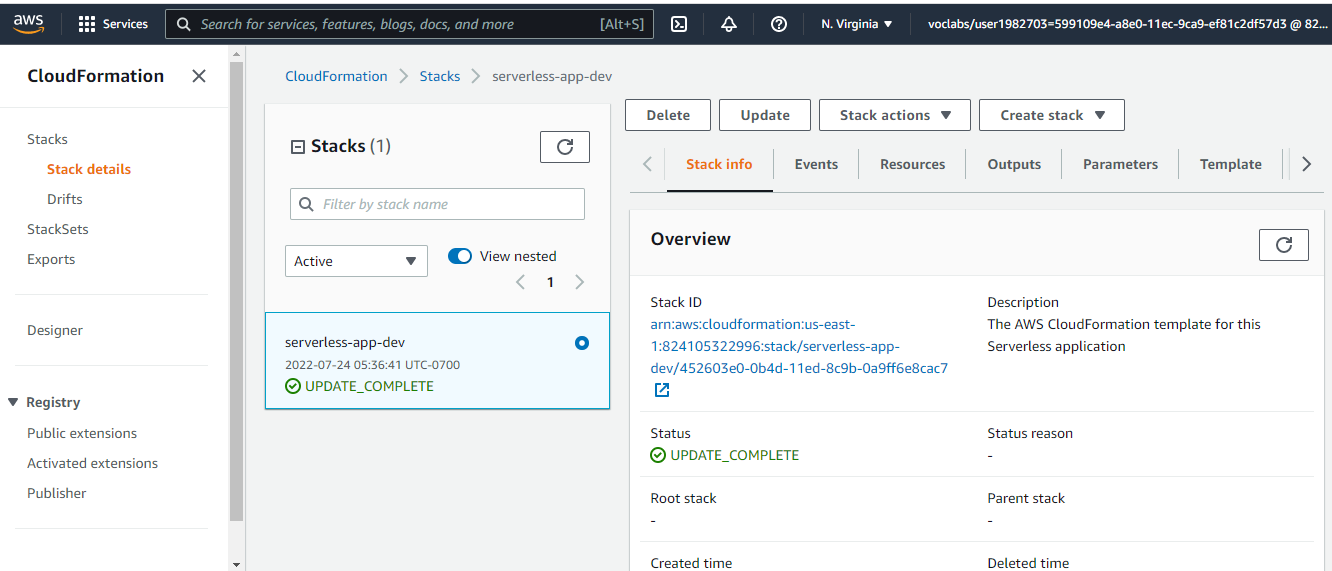
.promise()To deploy an application run the following commands:
cd backend

npm install

serverless

npm install --save-dev serverless-iam-roles-per-function@next

serverless deploy --verbose
- GET - https://im1th8rr46.execute-api.us-east-2.amazonaws.com/dev/todos
- POST - https://im1th8rr46.execute-api.us-east-2.amazonaws.com/dev/todos
- PATCH - https://im1th8rr46.execute-api.us-east-2.amazonaws.com/dev/todos/{todoId}
- DELETE - https://im1th8rr46.execute-api.us-east-2.amazonaws.com/dev/todos/{todoId}
- POST - https://im1th8rr46.execute-api.us-east-2.amazonaws.com/dev/todos/{todoId}/attachment
functions:
- Auth: serverless-dev-Auth
- GetTodos: serverless-dev-GetTodos
- CreateTodo: serverless-dev-CreateTodo
- UpdateTodo: serverless-dev-UpdateTodo
- DeleteTodo: serverless-dev-DeleteTodo
- GenerateUploadUrl: serverless-dev-GenerateUploadUrl
The client folder contains a web application that can use the API that should be developed in the project.
To use it please edit the config.ts file in the client folder:
const apiId = '...' API Gateway id
export const apiEndpoint = `https://${apiId}.execute-api.us-east-1.amazonaws.com/dev`

export const authConfig = {
  domain: '...',    // Domain from Auth0
  clientId: '...',  // Client id from an Auth0 application
  callbackUrl: 'http://localhost:3000/callback'
}To store TODO items you might want to use a DynamoDB table with local secondary index(es). A create a local secondary index you need to a create a DynamoDB resource like this:
TodosTable:
  Type: AWS::DynamoDB::Table
  Properties:
    AttributeDefinitions:
      - AttributeName: partitionKey
        AttributeType: S
      - AttributeName: sortKey
        AttributeType: S
      - AttributeName: indexKey
        AttributeType: S
    KeySchema:
      - AttributeName: partitionKey
        KeyType: HASH
      - AttributeName: sortKey
        KeyType: RANGE
    BillingMode: PAY_PER_REQUEST
    TableName: ${self:provider.environment.TODOS_TABLE}
    LocalSecondaryIndexes:
      - IndexName: ${self:provider.environment.INDEX_NAME}
        KeySchema:
          - AttributeName: partitionKey
            KeyType: HASH
          - AttributeName: indexKey
            KeyType: RANGE
        Projection:
          ProjectionType: ALL # What attributes will be copied to an index
To query an index you need to use the query() method like:
await this.dynamoDBClient
  .query({
    TableName: 'table-name',
    IndexName: 'index-name',
    KeyConditionExpression: 'paritionKey = :paritionKey',
    ExpressionAttributeValues: {
      ':paritionKey': partitionKeyValue
    }
  })
.promise()To run a client application first edit the client/src/config.ts file to set correct parameters. And then run the following commands
cd client
npm install
npm run start
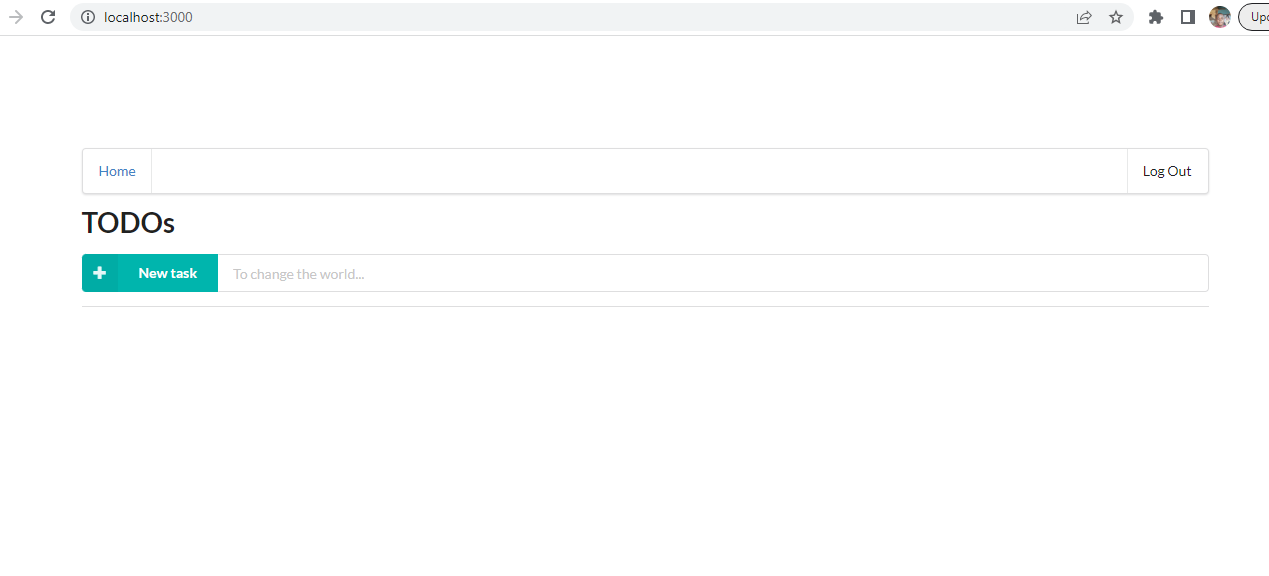
This should start a development server with the React application that will interact with the serverless TODO application.
An alternative way to test your API, you can use the Postman collection that contains sample requests. You can find a Postman collection in this project. To import this collection, do the following.
Click on the import button:

Click on the "Choose Files":

Select a file to import:

Right click on the imported collection to set variables for the collection:

Provide variables for the collection (similarly to how this was done in the course):
